AS/400 Installation Instructions
1)This software is mainly used by the Licensure Specialists in HR. The software install is pretty straight forward, but there are a few gotchas to watch out for.
Installing the IBM i Access for Windows 7.1
Log into the machine getting the software as an administrator
2)
Under the T drive, navigate to the Software/as400 folder
3)
Open the V7R1 folder
4)
Drill down to the image64a folder and open it
5)
Right click on setup.exe and select Run As Administrator
6) Follow all
Accept the
promptslicense terms and
takeclick Next
Accept the
defaultsdefault installation folder and click Next
Select your primary language as English and click Next
Select Complete for your setup type and click Next
You will be shown a couple of options that cannot be installed. Click Next
Click Install
Once the installation is finished, reboot the machine
After you reboot, you can log back in as the user to complete the setup
Configuring the connection to the AS/400
Locate the System i Navigator icon on the desktop and double-click it
You will be prompted to create a connection since one does not exist
Click Yes to create a new connection. A wizard launches
Enter the information below for the following boxes then click Next
System - as400.iss.k12.nc.us
Description - AS/400
Environment - Leave as My Connections
For the user ID, ask the user what their AS/400 login ID is and enter it in the Use default user ID, prompt as needed box
Test the connection by clicking the Verify Connection button. Your connection should test successfully. If not, click the Back button and verify that you have entered the information in correctly.
Click the Finish button and close the System i Navigator window
Configuring Sessions
Locate and double-click on the IBM i Access for Windows icon on the desktop.
Double-click on the Emulator folder
Double-click on the Start or Configure Session icon
Click the New Session button to create a new session. The following window will appear:
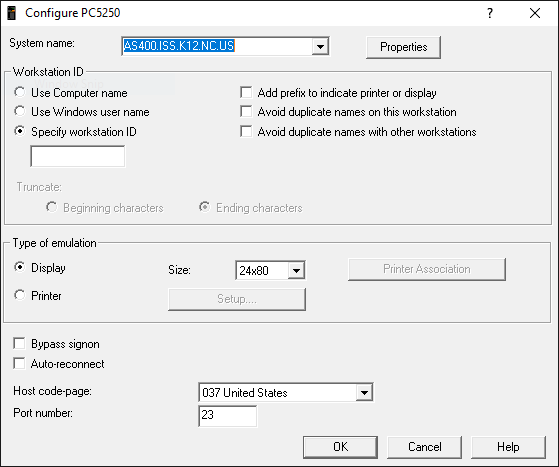 In the Specify workstation ID field, enter the First Initial, Last Name, and a number
 (
shouldi.e. JDOE1)
GOTCHA: If you create multiple sessions, use the same naming convention, but increment the number by 1
If you are configuring a display session, leave the type of emulation set to Display. If you are configuring a printer, change the emulation over to printer
If you choose printer, set the workstation ID to be First Initial, Last Name, PRT (i.e. JDOEPRT)
Click OK
Modify the session and keyboard layout at this point
Edit/Preferences/Appearance/Window Setup - Uncheck Long Session-ID and check Session Name.
Enter the name of your session here (i.e. Session 1)
If this is a printer, use this session name - AS400 Printer
Edit/Preferences/Keyboard - Change the keyboard mapping of the enter key on the keypad to match that of the enter key on the keyboard
Click the customize button
Click the enter key on the keypad and modify the Shift option
Change from [field exit] to [enter]
Click File/Save and close the window
Click OK to close the Keyboard Setup window
Save your session
GOTCHA: When you save your session, it may default to
install all options)
7) If a rebootprivate folder that is required, rebootin the computer.
user's 8)folder\appdata\local Launch
or
roaming\

 In the Specify workstation ID field, enter the First Initial, Last Name, and a number (