How to Add a Copier to a MacBook
|
Go to Filewave and Install the driver you need |
|
Click on the Apple in the top left hand corner of the screen |
|
Choose System Preferences |
|
Choose Printers & Scanners |
|
Click on the + button to add a printer |
|
|
Click the IP icon at the top and enter the following information: Address: Type the IP address of the printer you want to add. Protocol: Make sure it says Line Printer Daemon - LPD. You may have to choose it by click on the box and selecting it from the drop down. Name: Rename the “printer” to something meaningful. This name is what you will see in your printer list (for example Workroom copier). You will not see the Location in your printer list. Click the Add button. |
|
|
The following steps are for teachers to add copiers to their Macs. |
|
|
Open WORD or EXCEL Create a blank document or spreadsheet Click File from the menu at the top of the screen Choose Print |
|
In the Print window, Click on the drop down box below Presets (3rd one down) where it says Copies and Pages. Click on the box to show the drop down list and select Print Mode |
|
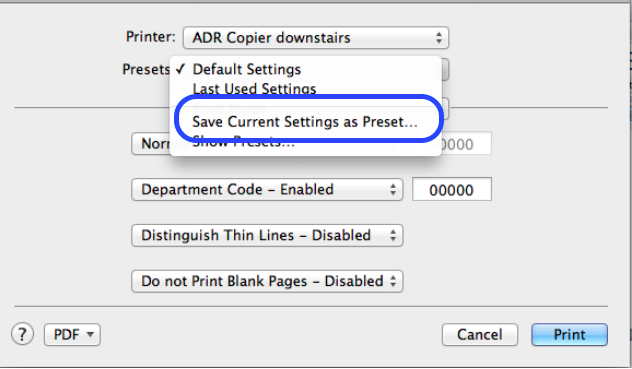
After selecting Print mode you will see these options: Check the box for Department Code Enter your Copier Department Code in the box BEFORE clicking Print you MUST click on Presets at the top and save your Department Code Setting! |
|
|
Presets: Save Current Setting as Preset ... |
|
|
Name your Preset Once you choose Save Current Setting as Preset (above) you will be able to “name” the Preset to something like “workroom copier w/dept code” Leave Preset Available for: Only this printer. Click Print to Print your document, or Cancel to save the preset. |
|
|
Be sure that when Printing to this copier, you choose the preset you just named. If you do not do this, your job will not automatically print and will go to the INVALID queue on the Copier. |
|


|
If you print without setting up a valid department code - Here is how to find your print job An Invalid job refers to a job held due to a wrong or no department code entered for printing the job. |
|
|
5.MANAGING PRINT JOBS FROM THE CONTROL PANEL On the Printer: On the panel, press the [PRINT] button |
|
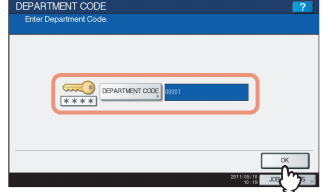
Enter your department code with the on-screen keyboard and digital keys, and then press [OK]. |
|
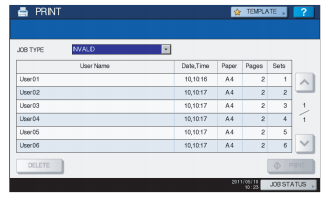
Select [INVALID] from the drop down JOB TYPE |
|
The Invalid jobs are listed on the screen - most recent at the top. You should be able to find your name in the list. |
|
|
Select the job for printing by pressing on it on the screen. The job will be highlighted on the screen. You can select multiple jobs. If the target job is not displayed on the screen, use the up and down arrows to the right to change between pages. |
|
Press [PRINT] and the job will start printing |
|
Deleting Invalid Jobs |
|
On the Invalid job list, select th job that you want to delete, and then press [DELETE]. |
|
When “Delete OK?” appears, press [DELETE]. |
|