Troubleshooting New SMART Boards
These SMART Boards look like the modern flatscreen TV, and you don't need a projector for them.
- Using the Buttons
- How to Use the Pens and Eraser
- Using Screenshots on a SMART Board
- Writing / Drawing on A Screenshot or Video
- Screen Share Issues
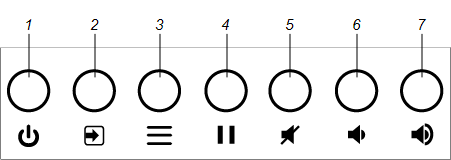
Using the Buttons
The front control panel contains the Power, Input Select, Menu, Freeze, Mute and volume control buttons.
|
No. |
Name |
SMART Board MX procedure |
|---|---|---|
|
1 |
Power |
Press to wake the display. Press to again enter Sleep mode. |
| 2 |
Input select |
Press to switch input source. |
| 3 |
Menu |
Press to open the display’s settings. |
| 4 | Freeze |
Press to freeze and unfreeze the screen. See Freezing the screen |
| 5 |
Mute |
Press to mute or unmute the volume. |
| 6 |
Volume decrease |
Press to turn down the volume. |
| 7 |
Volume increase |
Press to turn up the volume. |
You can use the buttons on the front control panel to increase and decrease the volume. You can also use the buttons on the remote control.
You can temporarily freeze the image on the screen by pressing the Freeze button on the front control panel (see Front control panel).
NOTES
-
Freezing the screen does not pause any applications that are running on the connected computer. It simply freezes the display of those applications.
-
Touch and ink are still active.
To unfreeze the screen, press the Freeze button on the front control panel again.
How to Use the Pens and Eraser
To write or draw in digital ink
-
Pick up one of the display’s pens.
-
Use the pen to write or draw in digital ink.
To erase digital ink
-

Move your fist or palm over the digital ink you want to erase.
Using Screenshots on a SMART Board
Screenshots are saved to the Files Library. Screenshots saved in the Files Library can be exported as PDFs to a USB drive. See Exporting files to a USB drive as a PDF.
|
Tool |
Icon |
Description |
|---|---|---|
|
Back |
|
Closes the screenshot and returns to the app. You can discard the screenshot or save it to the Files Library. |
|
Pen |
|
Tap the button to change pen type, ink width and ink color. |
|
Close |
|
Closes the screenshot and returns to the app. You can discard the screenshot or save it to the Files Library. |

To save a screenshot
-
Tap Back
 or Close
 .
. -
Tap Save to save the screenshot in the Files Library.
OR
Tap Discard to discard the screenshot and return to the app.
To open a saved screenshot
NOTE
If opening a file that’s on a USB drive, connect the USB drive to the display.
-
From the Home screen, tap Files Library
 .
. -
Select a drive.
TIP
Tap Downloads under Shortcuts to quickly find downloaded files.
-
Select a file by tapping the file’s tile.
The file opens in the appropriate app.
To close a screenshot
-
There are several ways to close a screenshot.
-
Tap Close
to close the screen. -
Tap
in the command bar. -
Erase all the ink. See Erasing ink on an annotation layer for more information.
-
Tap the Home button
 .
.
-
-
Tap Save to save a screenshot in the Files Library.
OR
Tap Discard to return to the app without saving a screenshot.
To delete a screenshot from the Files Library
-
From the Home screen, tap Files Library
. -
Tap and hold the tile until the background becomes black.
-
Tap additional tiles to select them.
OR
Tap Select All to select all the tiles.
-
Tap Delete in the upper-right corner.
The tile is removed from the Files Library.
Writing / Drawing on A Screenshot or Video
-
If you write or draw over a playing video, the audio will be muted but the video will continue to play.
-
Screenshots are enabled when you install third-party apps on the display.
-
You can disable or enable screenshots by creating a remote execution command and deploying the command to displays. See Enabling and disabling acetates in apps.
To write or draw on a screenshot
-
Pick up one of the display’s pens.
-
Use the pen to write or draw in digital ink. The screenshot appears as a striped semitransparent layer.
-
When you’re done, tap Close
or Back in the command bar to save or close the screenshot.
Screen Share Issues
In some instances, restarting the Screen Share app and its discovery services resolves issues with the app.
-
Tap Settings
 .
. -
Scroll to Application Settings > Screen Share.
-
Tap Reset.
|
Issue |
Solutions |
|---|---|
|
|
|
AirPlay is not displaying on the mobile device. |
|
|
The display’s name does not appear in the list of devices |
|
|
The display’s name appears in the list of available devices but you can’t connect to it. |
|
|
The device can connect to the display but the video quality is poor or the device disconnects frequently. |
|
|
The video has no audio. |
|
|
The screen is not responding to touch or you’re unable to write or draw with the pens. |
|
|
The Mac computer can’t share its screen. |
|