# Toshiba Papercut

# How to Change or Add Papercut Codes

1. <span style="font-size:11pt;font-family:Arial;background-color:transparent;font-weight:400;font-style:normal;font-variant:normal;white-space:pre-wrap;">Go to </span>[<span style="font-size:11pt;font-family:Arial;color:rgb(17,85,204);background-color:transparent;font-weight:400;font-style:normal;font-variant:normal;text-decoration-line:underline;white-space:pre-wrap;">http://iss-papercut:9191/admin</span>](http://iss-papercut:9191/admin)
2. <span style="font-size:11pt;font-family:Arial;background-color:transparent;font-weight:400;font-style:normal;font-variant:normal;white-space:pre-wrap;">Login with your computer credentials (Not your full email)</span>
3. <span style="font-size:11pt;font-family:Arial;background-color:transparent;font-weight:400;font-style:normal;font-variant:normal;white-space:pre-wrap;">Click Users on the left hand side of your screen</span>
4. <span style="font-size:11pt;font-family:Arial;background-color:transparent;font-weight:400;font-style:normal;font-variant:normal;white-space:pre-wrap;">Search for the user you are wanting to set the passcode for</span>
5. <span style="font-size:11pt;font-family:Arial;background-color:transparent;font-weight:400;font-style:normal;font-variant:normal;white-space:pre-wrap;"><span style="font-size:11pt;font-family:Arial;background-color:transparent;font-weight:400;font-style:normal;font-variant:normal;white-space:pre-wrap;">Scroll down to the secondary pin, and set the users secondary pin as their copy code  
    </span></span>[![image.png](https://iss-kb.iss.k12.nc.us/uploads/images/gallery/2023-01/scaled-1680-/image.png)](https://iss-kb.iss.k12.nc.us/uploads/images/gallery/2023-01/image.png)

# How to Scan with Papercut

<table id="bkmrk-step-1%3A-enter-your-p" style="border-collapse:collapse;width:100%;height:600.172px;"><colgroup><col style="width:50.0618%;"></col><col style="width:50.0618%;"></col></colgroup><tbody><tr style="height:46.5938px;"><td style="height:46.5938px;">Step 1: Enter your PaperCut ID# (Timekeeper #)

</td><td style="height:46.5938px;">Step 2: Click Access Device.</td></tr><tr style="height:251.391px;"><td style="height:251.391px;">[![image.png](https://iss-kb.iss.k12.nc.us/uploads/images/gallery/2023-01/scaled-1680-/HP0image.png)](https://iss-kb.iss.k12.nc.us/uploads/images/gallery/2023-01/HP0image.png)

</td><td style="height:251.391px;">[![image.png](https://iss-kb.iss.k12.nc.us/uploads/images/gallery/2023-01/scaled-1680-/MvMimage.png)](https://iss-kb.iss.k12.nc.us/uploads/images/gallery/2023-01/MvMimage.png)

</td></tr><tr style="height:29.7969px;"><td style="height:29.7969px;">Step 3. Click the Home button on the Right and then find scan </td><td style="height:29.7969px;">Step 4. Click Email</td></tr><tr style="height:203.406px;"><td style="height:203.406px;">[![image.png](https://iss-kb.iss.k12.nc.us/uploads/images/gallery/2023-01/scaled-1680-/WC9image.png)](https://iss-kb.iss.k12.nc.us/uploads/images/gallery/2023-01/WC9image.png)  
</td><td style="height:203.406px;">[![image.png](https://iss-kb.iss.k12.nc.us/uploads/images/gallery/2023-01/scaled-1680-/Nnaimage.png)](https://iss-kb.iss.k12.nc.us/uploads/images/gallery/2023-01/Nnaimage.png)  
</td></tr></tbody></table>

# How to Print with Toshiba Papercut on Mac

<span style="background-color:rgb(241,196,15);">The Macbook **MUST** be on OS Sonoma and the Toshiba Drivers <span style="text-decoration:underline;">***MUST BE INSTALLED FROM MOSYLE MANAGER FIRST OR ELSE THESE STEPS WILL NOT WORK!!***</span></span>

<table id="bkmrk-1.-click-on-the-appl" style="border-collapse:collapse;width:100%;height:2268.08px;"><colgroup><col style="width:50.0618%;"></col><col style="width:50.0618%;"></col></colgroup><tbody><tr><td>Make sure your Mac is on OS Sonoma

Click **About this Mac** in the Top Left

[![image.png](https://iss-kb.iss.k12.nc.us/uploads/images/gallery/2024-08/scaled-1680-/image.png)](https://iss-kb.iss.k12.nc.us/uploads/images/gallery/2024-08/image.png)

</td><td>
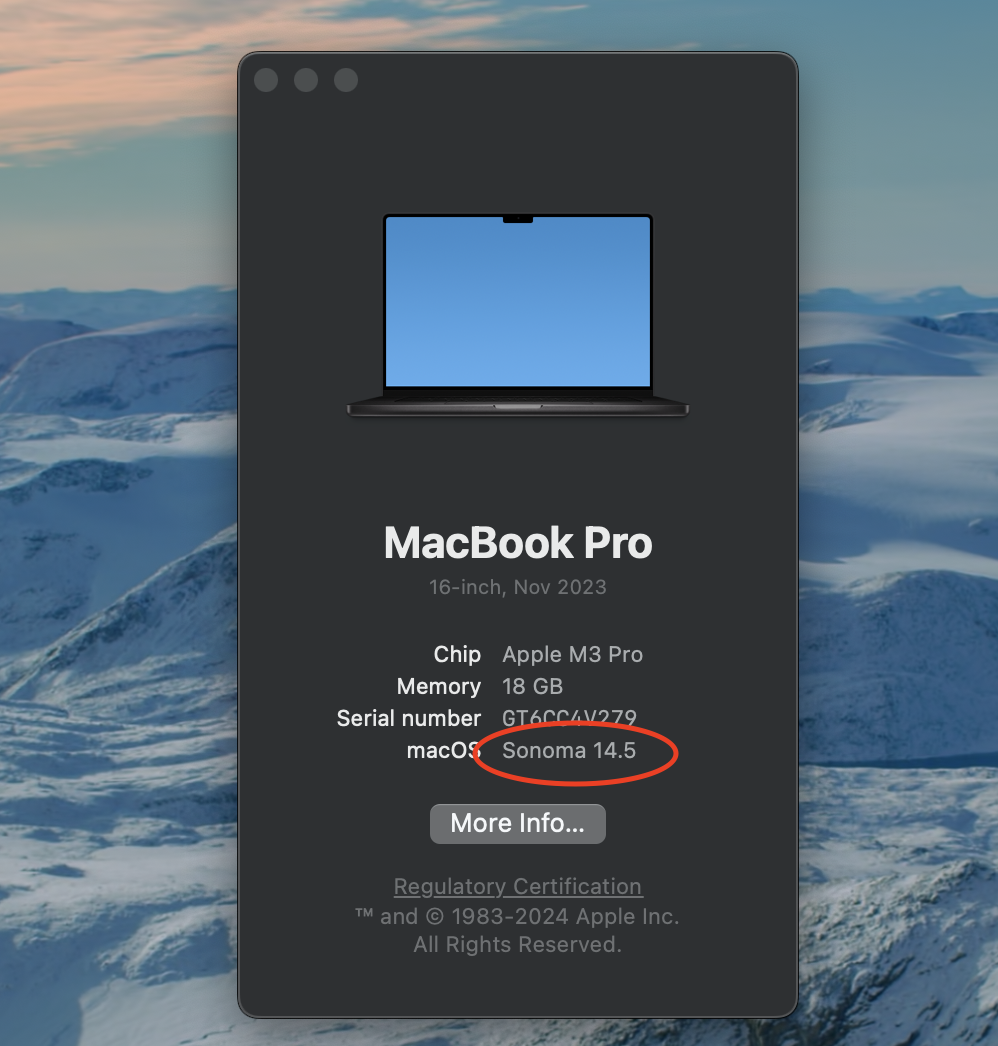
If it shows MacOS Sonoma, go to the next step on this page, if it does <span style="text-decoration:underline;">**NOT**</span> say macOS Sonoma - If it is Mojave, Big Sur, Catalina, Ventura, Monterey then follow the instructions in this link: [Add ISS Copiers to Macbook (Pre OS Sonoma)](https://iss-kb.iss.k12.nc.us/books/mac-how-tos/page/add-iss-copiers-to-macbook-pre-os-sonoma)

[![image.png](https://iss-kb.iss.k12.nc.us/uploads/images/gallery/2024-08/scaled-1680-/KAXimage.png)](https://iss-kb.iss.k12.nc.us/uploads/images/gallery/2024-08/KAXimage.png)

</td></tr><tr style="height:376.805px;"><td style="height:376.805px;">
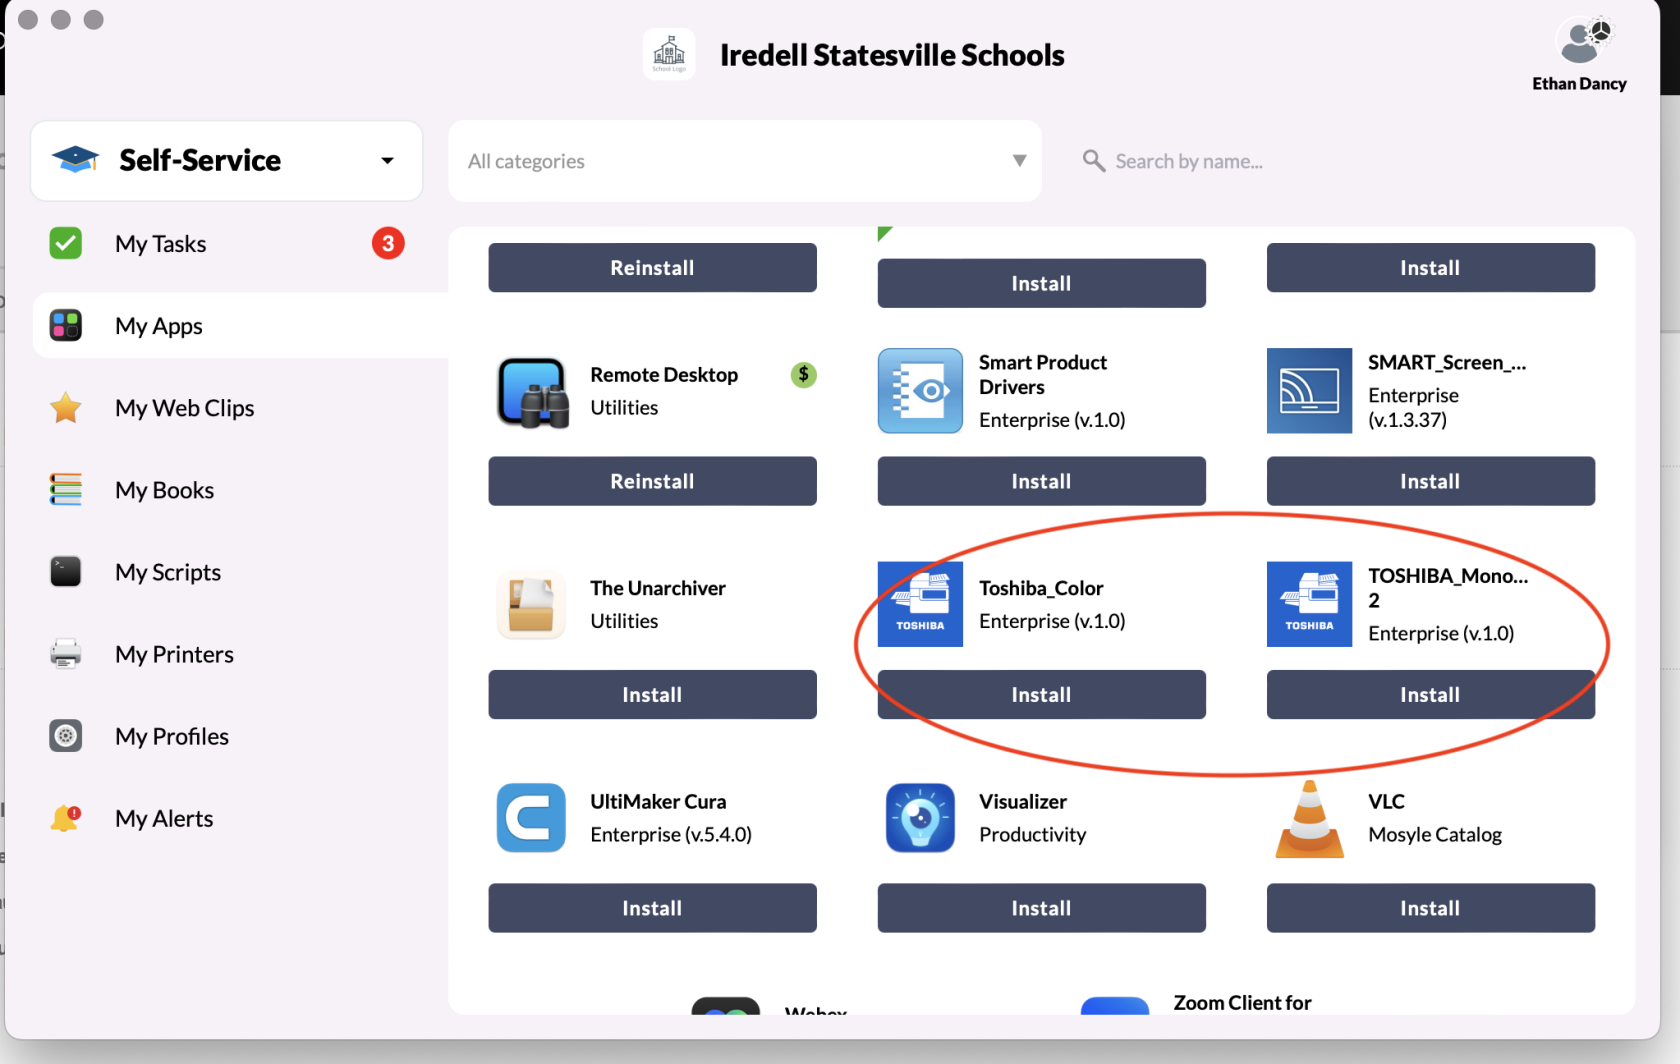
1. Go To Mosyle, and go to Self Service and install the **Toshiba Drivers** (pic below)  
  
  
[![image.png](https://iss-kb.iss.k12.nc.us/uploads/images/gallery/2024-08/scaled-1680-/5Apimage.png)](https://iss-kb.iss.k12.nc.us/uploads/images/gallery/2024-08/5Apimage.png)

</td><td style="height:376.805px;">
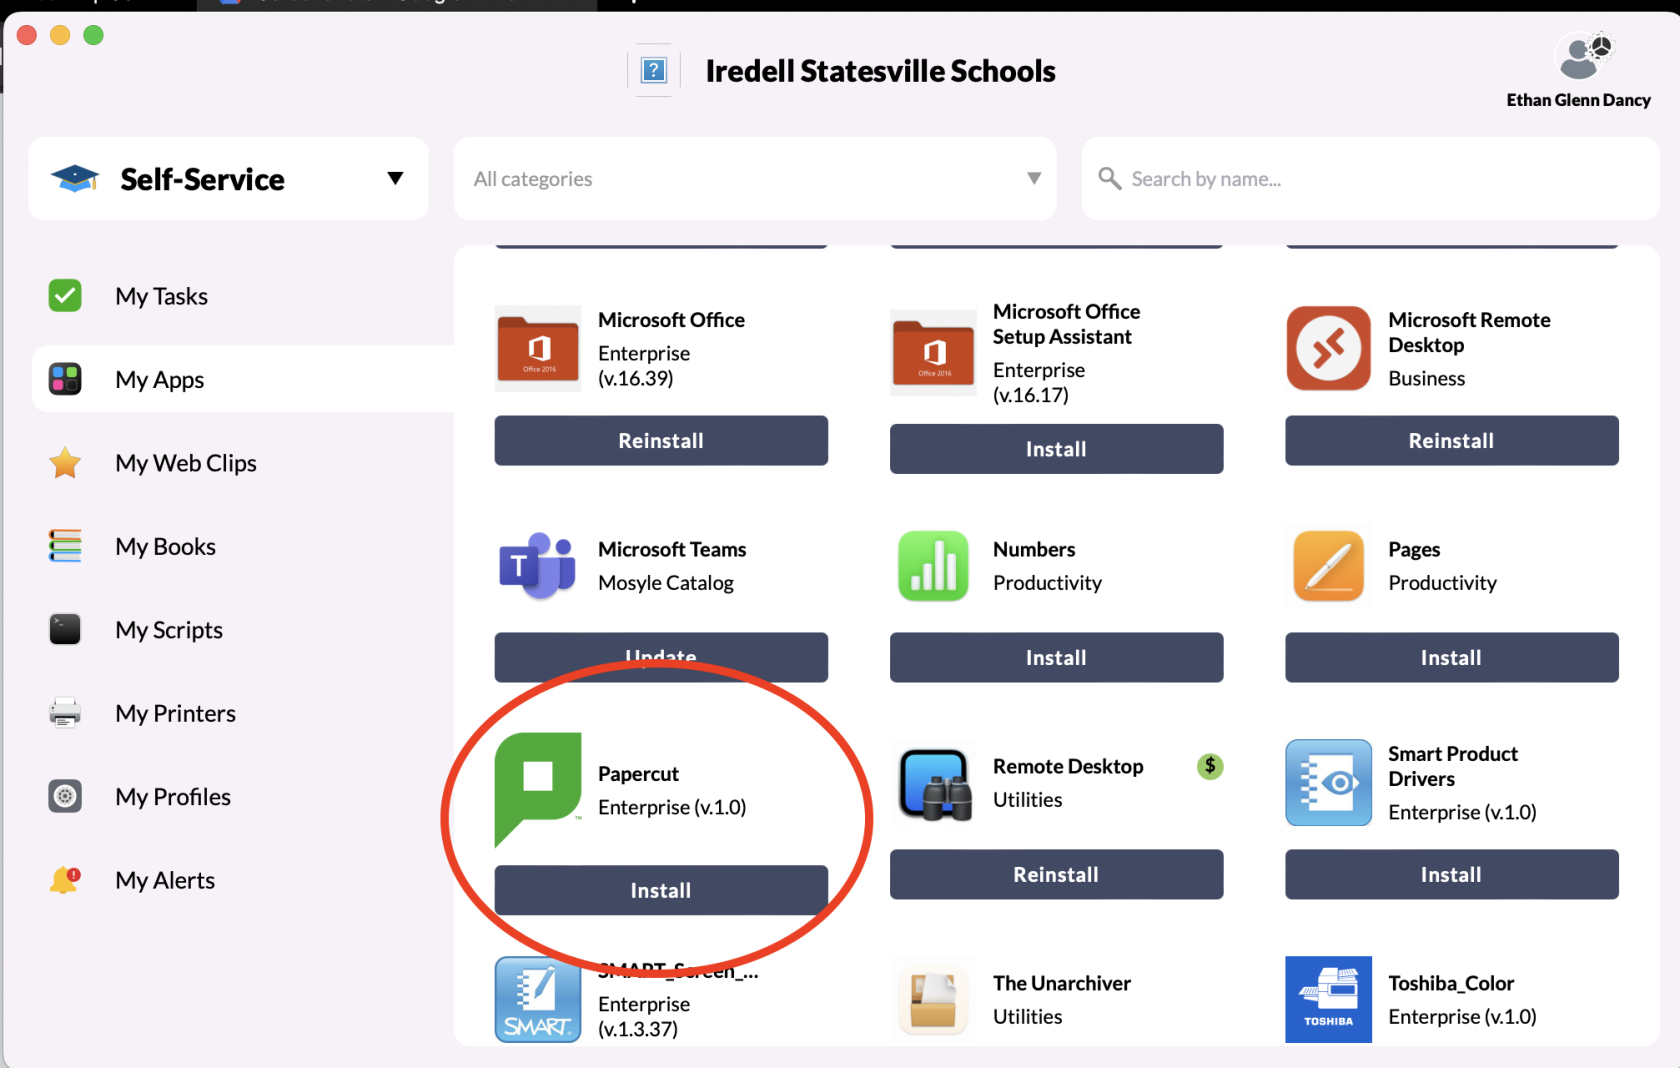
2\. Install **Papercut** from Manager (pic below)

[![image.png](https://iss-kb.iss.k12.nc.us/uploads/images/gallery/2023-09/scaled-1680-/image.png)](https://iss-kb.iss.k12.nc.us/uploads/images/gallery/2023-09/image.png)

</td></tr><tr style="height:287.672px;"><td style="height:287.672px;">3\. After Installing Papercut, you should now have an icon at the top of your screen that is green and looks like a printer. Click on this, and click View My Printers.

</td><td style="height:287.672px;">[![image.png](https://iss-kb.iss.k12.nc.us/uploads/images/gallery/2023-09/scaled-1680-/I56image.png)
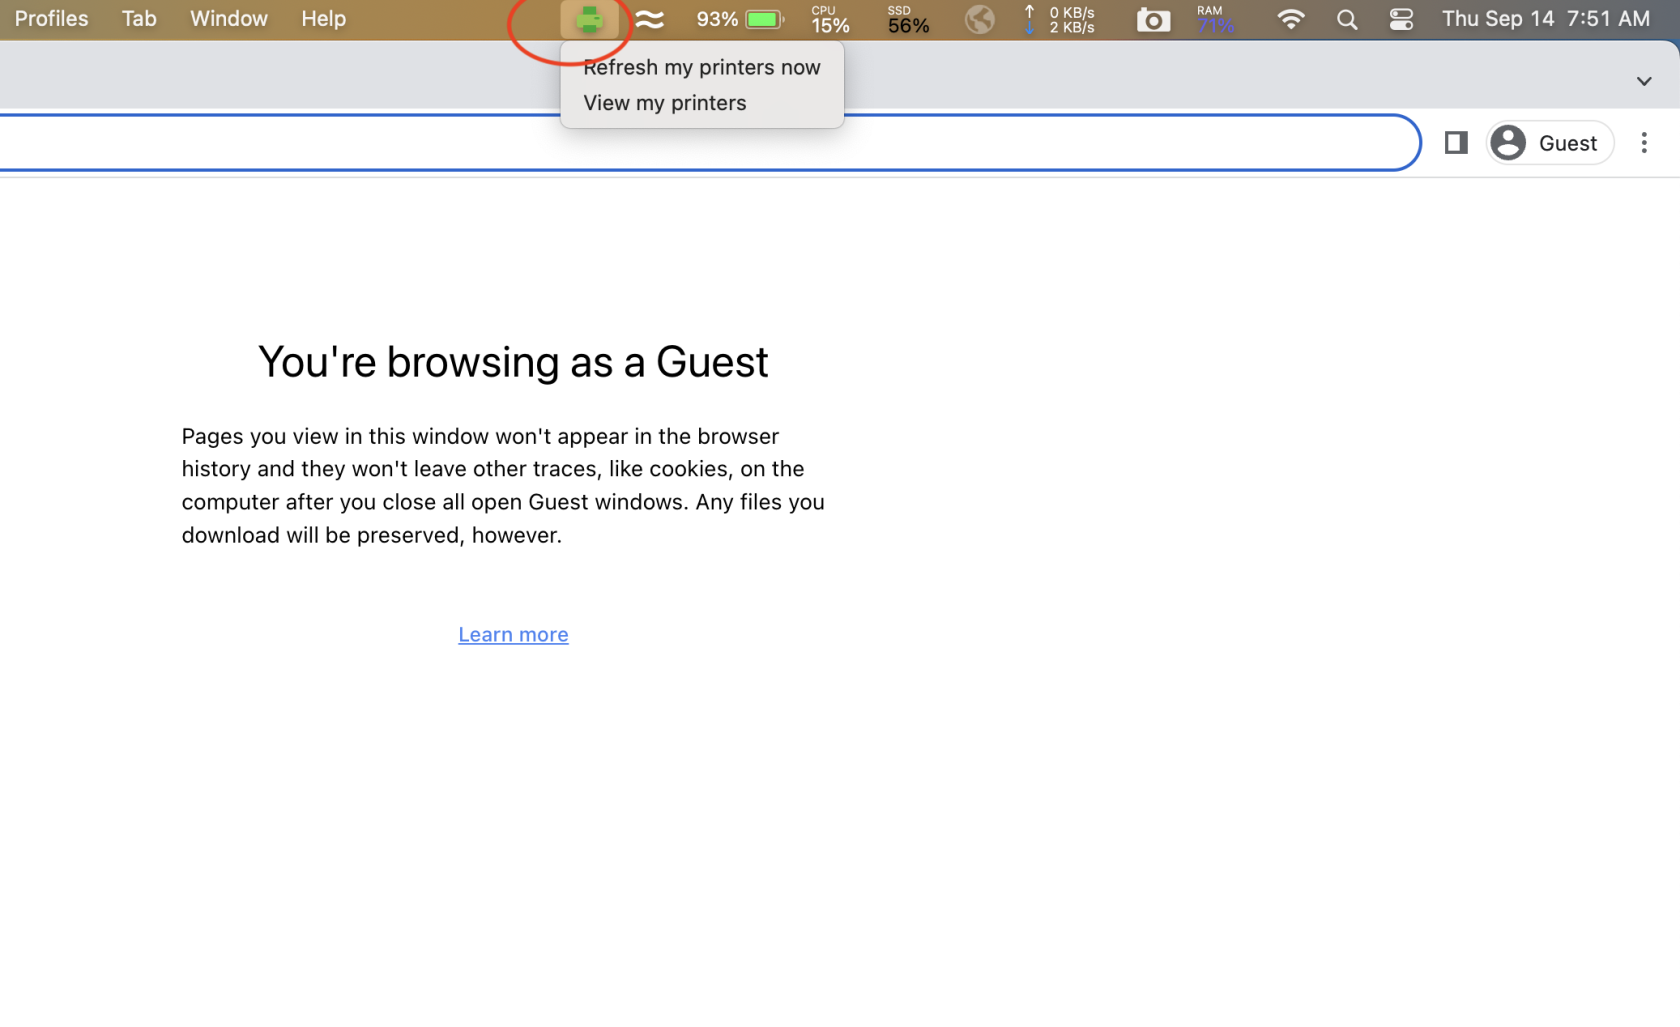
](https://iss-kb.iss.k12.nc.us/uploads/images/gallery/2023-09/I56image.png)

</td></tr><tr style="height:82.6875px;"><td style="height:82.6875px;">4. You may receive a login window like the one pictured to the right. If you do, it will be the same login as your computer login and same password as your computer password. </td><td style="height:82.6875px;">[![image.png](https://iss-kb.iss.k12.nc.us/uploads/images/gallery/2023-09/scaled-1680-/1tbimage.png)
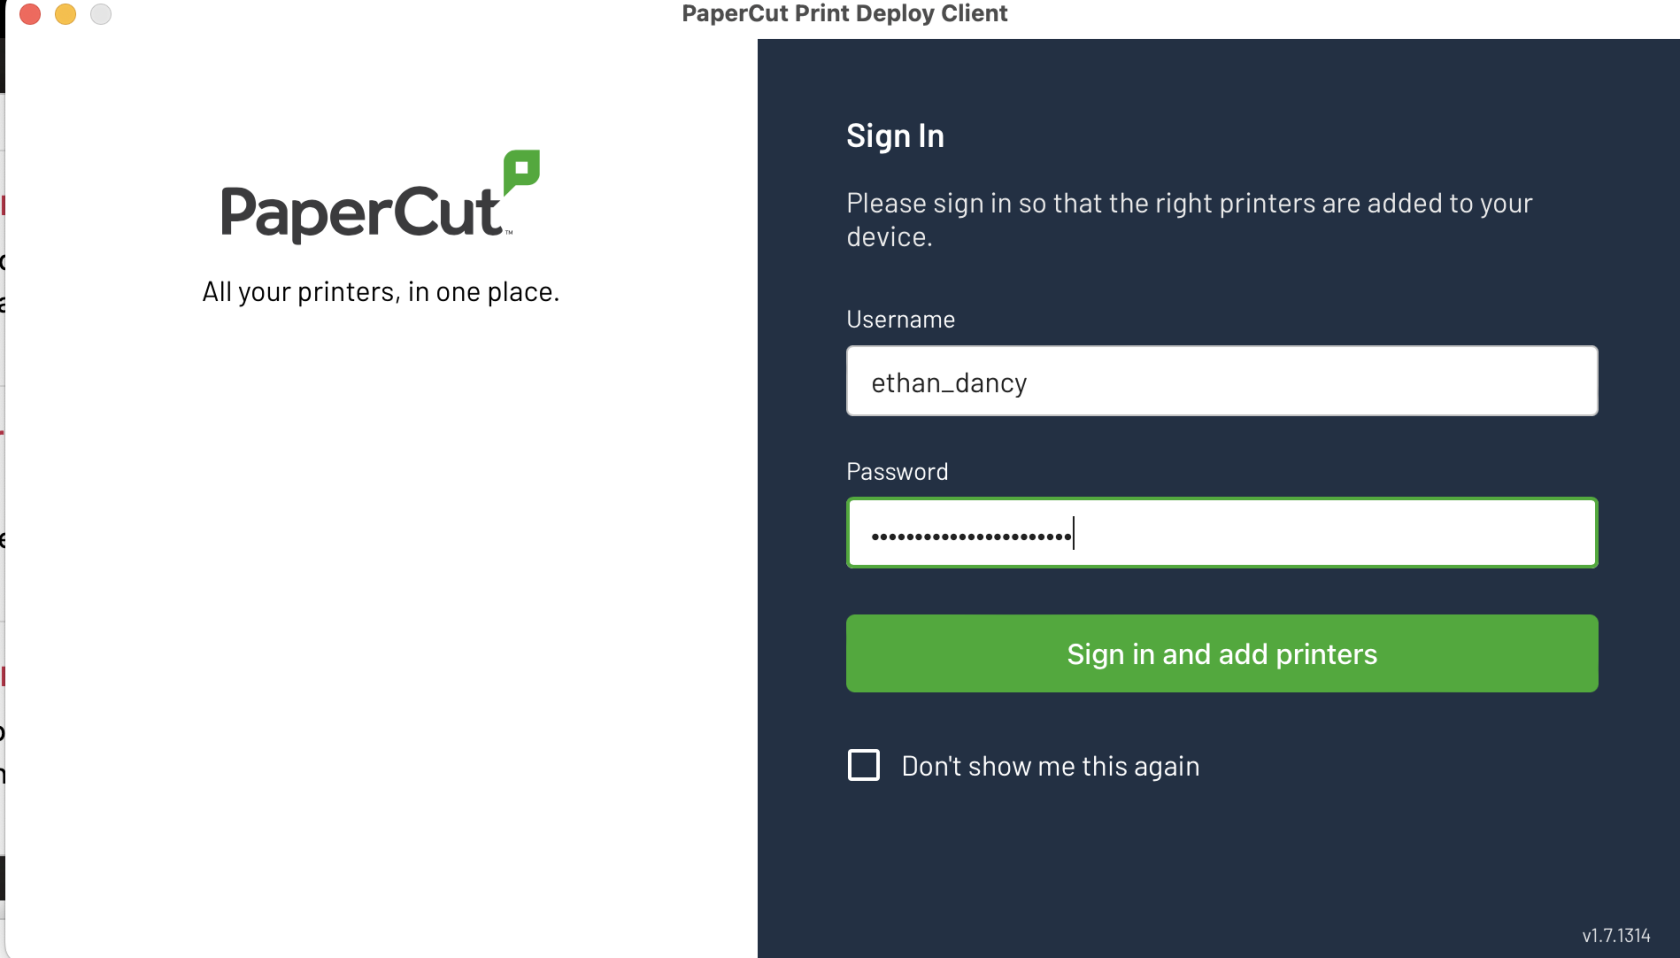
](https://iss-kb.iss.k12.nc.us/uploads/images/gallery/2023-09/1tbimage.png)

</td></tr><tr><td>  
</td><td>  
</td></tr><tr style="height:54.6953px;"><td style="height:54.6953px;">5. If you need to add a printer, go to Add Printers on the left, and install <span style="background-color:rgb(241,196,15);">**ISS\_Copiers**</span></td><td style="height:54.6953px;">[![image.png](https://iss-kb.iss.k12.nc.us/uploads/images/gallery/2024-08/scaled-1680-/Losimage.png)](https://iss-kb.iss.k12.nc.us/uploads/images/gallery/2024-08/Losimage.png)

</td></tr><tr style="height:488.93px;"><td style="height:488.93px;">6. The printers that you installed should now show up in System Preferences &gt; Printers &amp; Scanners</td><td style="height:488.93px;">[![image.png](https://iss-kb.iss.k12.nc.us/uploads/images/gallery/2023-09/scaled-1680-/hCKimage.png)
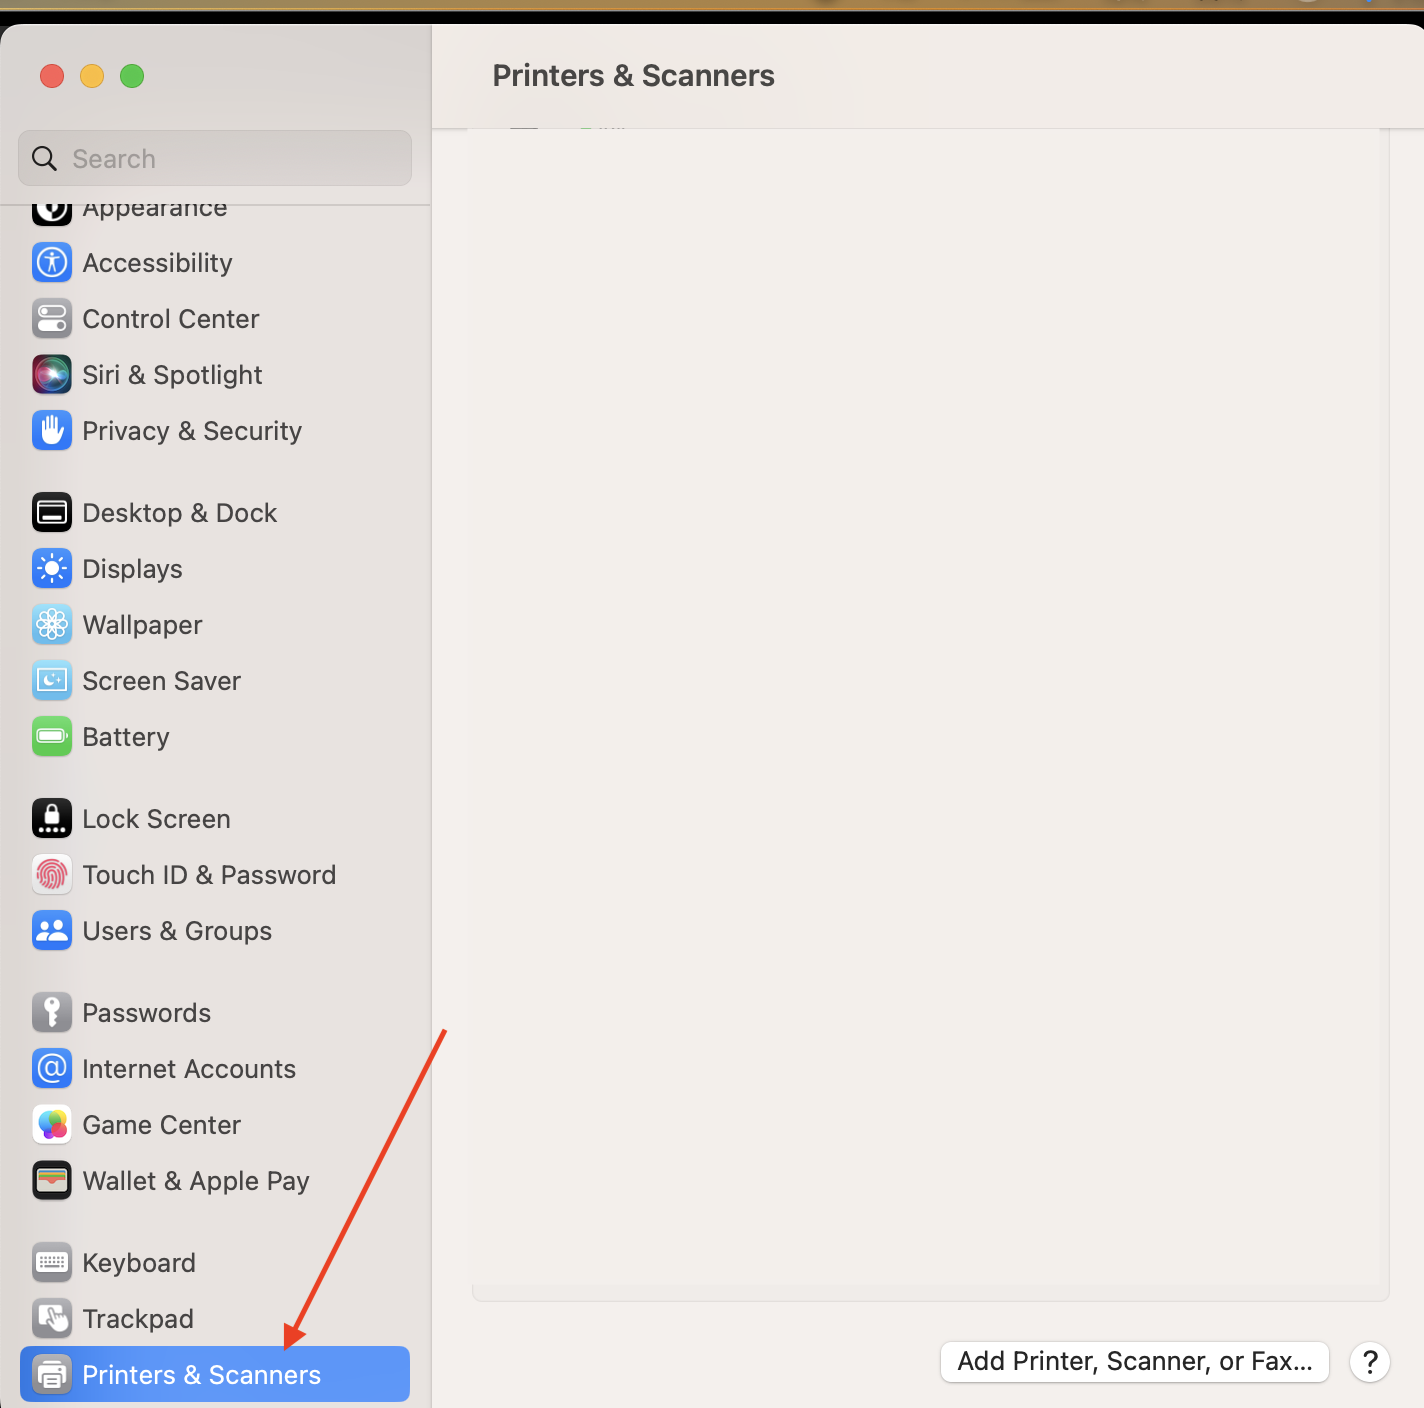
](https://iss-kb.iss.k12.nc.us/uploads/images/gallery/2023-09/hCKimage.png)

</td></tr><tr><td>  
</td><td>  
</td></tr><tr style="height:234.438px;"><td style="height:234.438px;">
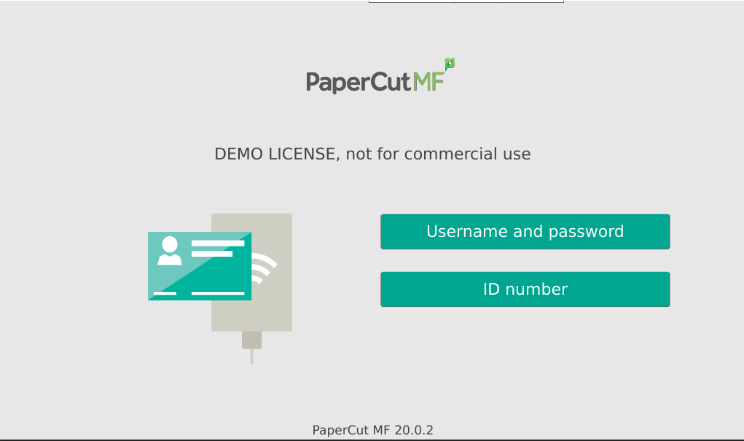
Now, you should be able to print to any copier on this site that has papercut. You will need to retrieve it by entering your ID Number (Timekeeper Number for most people)

</td><td style="height:234.438px;"> ![4CjUeqTcX0ti6hpSj2HlprbPgL8epWrhK4af76DTk99ETtQt1UvjxMUiSjF2ZzA2snDf0b_Z7JWfdflQEX1IvoCTxgzRsyvPKwWm73t0SeNa4Ze9Lw-YZEcO9tJUN5sQGgmIbI6fOFR9S-TOY7TqZcaoyK8j5ILLM2ooQvOqdPThCFsNp6QlcFCdaUJw-f3YIVy5-ngCig](https://lh5.googleusercontent.com/4CjUeqTcX0ti6hpSj2HlprbPgL8epWrhK4af76DTk99ETtQt1UvjxMUiSjF2ZzA2snDf0b_Z7JWfdflQEX1IvoCTxgzRsyvPKwWm73t0SeNa4Ze9Lw-YZEcO9tJUN5sQGgmIbI6fOFR9S-TOY7TqZcaoyK8j5ILLM2ooQvOqdPThCFsNp6QlcFCdaUJw-f3YIVy5-ngCig)

</td></tr></tbody></table>