iPad How To's
How to Use iPad with Apple TV
AirPlay video from your iPhone, iPad, or iPod touch
- Connect your iOS device to the same Wi-Fi network as your Apple TV or AirPlay 2-compatible smart TV.
- Find the video that you want to AirPlay.
- Tap
 . In some third-party apps, you might need to tap a different icon first.* In the Photos app, tap
  , then tap .
 - Choose your Apple TV or AirPlay 2-compatible smart TV. Need help?
To stop streaming, tap ![]() in the app that you're streaming from, then tap your iPhone, iPad, or iPod touch from the list.
in the app that you're streaming from, then tap your iPhone, iPad, or iPod touch from the list.
*Some video apps on iOS might not support AirPlay. If you can’t use AirPlay with a video app, check the App Store for tvOS to see if that app is available on Apple TV.
If video automatically streams to an AirPlay device
Your iOS device might automatically AirPlay video to the Apple TV or AirPlay 2-compatible smart TV that you frequently use. If you open a video app and see ![]() in the upper-left corner, then an AirPlay device is already selected.
in the upper-left corner, then an AirPlay device is already selected.
To use AirPlay with a different device, tap![]() , then tap another device, or tap "iPhone" to stop streaming with AirPlay.
, then tap another device, or tap "iPhone" to stop streaming with AirPlay.
How to Reset iPad Passcodes
iPad Passcode Reset Directions
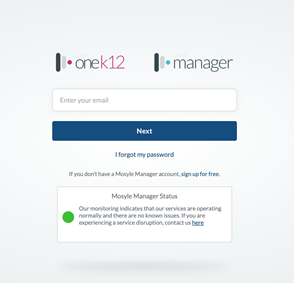
1. Go to myschool.mosyle.com and login with your provided login.
Note: Change the password for security purposes
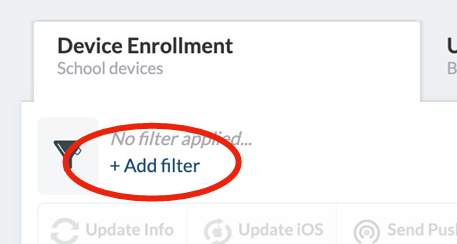
2. Click, “Management,” at the bottom of the screen to access the Device Enrollment screen

Device Enrollment Screen Notes:
• Make sure the top left shows this image.
These directions will ONLY work for iPad Passcode purpose
• Do not worry about device names listed. Some may not list the asset tag, and that’s not a problem.
3. Click +Filter under Device enrollment
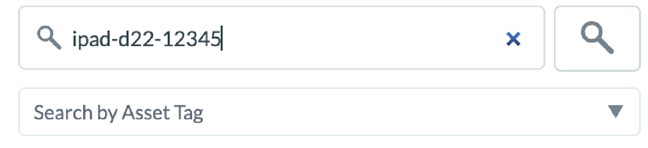
4. Click the, “Search by Serial Number,” dropdown and change it to, “Search by Asset Tag.”

5. Type in or scan the asset tag
NOTE: Type the whole asset tag, not just the numbers at the end
6. Click on the device name (asset tag number). Make sure the correct student name is listed.

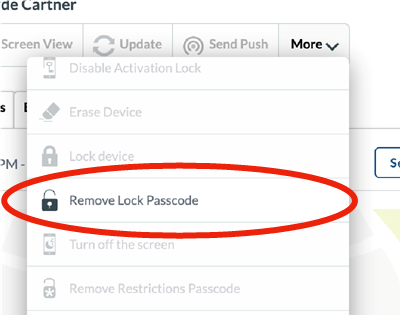
7. Click the, “More,” dropdown and choose,
“Remove Lock Passcode.”
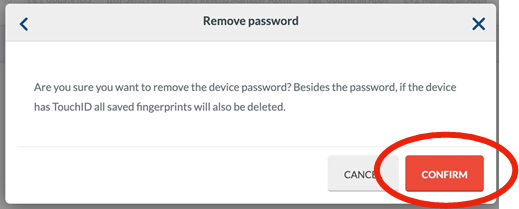
8. Click, “Confirm.”
This disables the passcode and sends a reset command to student iPad
9. Student iPad will get a message to reset the passcode. Click, “Change Now,” and then enter new passcode.
Note: If student clicks, “Later,” they will have 59 minutes to reset before they are forced to.
