Drive
- Google Docs
- How to use Google Docs
- Docs cheat sheet
- Change page setup of a Google Doc
- Switching to Docs from Microsoft Word
- Google Sheets
- How to Use Google Sheets
- Edit & format a spreadsheet in Google Sheets
- Use conditional formatting rules in Google Sheets
- Sort & filter your data in Google Sheets
- Google Slides
- Google Forms
- How to use Google Forms
- Create & grade quizzes with Google Forms
- How to Show questions based on answers in Google Forms
- Filestream
- Transfer Ownership in Google Drive
- How to Share Google Calendar
- Share a File in Google Drive
- Check or revert to earlier file versions in Drive
- How to Upload to Google Drive
- Ways to Transfer Google Drive Files
Google Docs
Information on How to Use Google Docs
How to use Google Docs
Google Docs is an online word processor that lets you create and format documents and work with other people. See our top five tips for Google Docs.
Step 1: Create a document
To create a new document:
- On your computer, open the Docs home screen at docs.google.com.
- In the top left, under "Start a new document," click New.
You can also create new documents from the URL docs.google.com/create.
Step 2: Edit and format
To edit a document:
- On your computer, open a document in Google Docs.
- To select a word, double-click it or use your cursor to select the text you want to change.
- Start editing.
- To undo or redo an action, at the top, click Undo or Redo .
Note: To edit a document on a touchscreen device, like a Pixel Book, double-tap the document to start typing.
You can add and edit text, paragraphs, spacing, and more in a document.
Step 3: Share & work with others
Docs cheat sheet
1. Edit and add styles to your text. 

2. Work with different versions and copies of your document.
Make a copy: Create a duplicate of your document.
Download as: Download your document in other formats, such as Microsoft® Word® or Adobe® PDF.
Email as attachment: Send a copy of the document to people. You can change the format.
Version history: See all the changes you and others have made to the document or revert to earlier versions.
Publish to the web: Publish a copy of your document as a webpage, or embed your document in a website.

3. Enhance your document by adding features.
Image: Insert an image from your computer, the web, Drive, and more.
Table: Select the number of columns and rows to create a table.
Drawing: Create pictures, flowcharts, diagrams, and more.
Link: Add a link to a webpage or a header or bookmark in your document.
Chart: Add different types of charts, or add a chart from Sheets.
Bookmark: Add shortcuts to specific places within your document.
Table of contents: Create an autogenerated table of contents that links to each heading (where you’ve applied heading styles).

4. Click Share to share your document and then choose what collaborators can do. They’ll also receive an email notification.
| Share or unshare | Edit content directly | Suggest edits | Add comments | |
|---|---|---|---|---|
| Can edit | ✔ | ✔ | ✔ | ✔ |
| Can comment | ✔ | ✔ | ||
| Can view |
5. Collaborate with your team in real time.

Change page setup of a Google Doc
- On your computer, open a document in Google Docs.
- In the toolbar, click File
Page setup.
- Go to the setting you want to change:
- Orientation
- Paper size
- Page color
- Margins
- Make your changes.
- Click OK.
- Optional: To make new documents open with the settings you chose, click Set as default.
Switching to Docs from Microsoft Word
| In Word... | In Docs... | ||||||
|---|---|---|---|---|---|---|---|
| Share your document using Microsoft® SharePoint® or OneDrive® |
For more details, see Get started with Docs. Share your document with Word users
For more details, see Work with Microsoft Office files. |
||||||
| Collaborate in real-time in Word Online |
When you share a document, depending on their access, collaborators can edit documents, add comments, and assign tasks.
|
||||||
| Access version history in SharePoint or OneDrive |
For more details, read See changes to your Drive files and folders.
|
||||||
| Track changes in a document |
Make suggestions in a document
 Add and assign comments in a document
|
||||||
| Open a Word document |
Any changes you make are saved to the original Microsoft Office file. For more details, see Work with Microsoft Office files.
|
||||||
| Access a document offline in OneDrive |
To learn how to access files offline from your desktop or mobile, see Access stored Drive files without the internet. |
||||||
| Save a document automatically in SharePoint or OneDrive or turn on AutoRecover | |||||||
| Insert pictures in your document |
You can drag and drop images from your computer into your document. Or, click Insert For more details, see Add and edit images. |
||||||
| Add an Excel chart to your document |
For more details, see Insert and edit charts. |
Google Sheets
How to Use Google Sheets
Step 1: Create a spreadsheet
To create a new spreadsheet:
- Open the Sheets home screen at sheets.google.com.
- Click New
. This will create and open your new spreadsheet.
You can also create new spreadsheets from the URL sheets.google.com/create.
Step 2: Edit and format a spreadsheet
You can add, edit, or format text, numbers, or formulas in a spreadsheet.
Step 3: Share & work with others
Edit & format a spreadsheet in Google Sheets
Edit data in a cell
- Open a spreadsheet in Google Sheets.
- Click a cell that’s empty, or double-click a cell that isn’t empty.
- Start typing.
- Optional: To add another line within a cell, press ⌘ + Enter on a Mac or Ctrl + Enter on Windows.
- When you’re done, press Enter.
Format one or more cells
- Open a spreadsheet in Google Sheets.
- Click a cell, then drag your mouse across nearby cells you want to select, or hold ⌘ on a Mac or Ctrl on Windows and click another cell.
- To format text or numbers in a cell, use the options in the toolbar at the top.
Format your data
Here are some options for formatting your cells or text. You can find these options above the document.
Undo
Redo
Bold
Italic
Strikethrough
- Change font or font size
Change text color
Change cell fill color
- Single color
- Alternating colors
Change cell borders
Change border color
Change border style
Merge cells
- Change horizontal text alignment
- Change vertical text alignment
- Rotate text in a cell
Wrap text in a cell
To format part of the text or content in a cell, double-click the cell, select what you want to format, then select a formatting option.
Align & resize objects
Add a theme
You can apply changes to the format of an entire spreadsheet with themes.
- Open a spreadsheet in Google Sheets.
- At the top, click Format
Theme.
- Choose an available theme or click Customize to create your own.
Notes:
- If you create a custom theme, the most recent version will be saved.
- Colors from your current theme are available in the text and fill color pickers.
Parts of your spreadsheet affected by theme
- Text font and color of grid text, charts, and pivot tables
- Hyperlink color of grid text
- Chart background color
- Color of series in charts
- Pivot table background
Note: If you change the format of an item in your spreadsheet, it will override the theme.
Use conditional formatting rules in Google Sheets
Cells, rows, or columns can be formatted to change text or background color if they meet certain conditions. For example, if they contain a certain word or a number.
- On your computer, open a spreadsheet in Google Sheets.
- Select the cells you want to apply format rules to.
- Click Format
- Create a rule.
- Single color: Under "Format cells if," choose the condition that you want to trigger the rule. Under "Formatting style, choose what the cell will look like when conditions are met.
- Color scale: Under "Preview," select the color scale. Then, choose a minimum and maximum value, and an optional midpoint value. To choose the value category, click the Down arrow
.
- Click Done.
A teacher can highlight test scores to see which students scored less than 80%.
- On your computer, open a spreadsheet in Google Sheets.
- Select the test scores.
- Click Format
- Under "Format cells if," click Less than. If there's already a rule, click it or Add new rule
- Click Value or formula and enter 0.8.
- To choose a red color, click Fill
.
- Click Done. The low scores will be highlighted in red.
Use advanced conditional formatting
You can use custom formulas to apply formatting to one or more cells based on the contents of other cells.
- On your computer, open a spreadsheet in Google Sheets.
- Select the cells you want to format.
- Click Format
- Under the "Format cells if" drop-down menu, click Custom formula is. If there's already a rule, click it or Add new rule
- Click Value or formula and add the formula and rules.
- Click Done.
Note: Formulas can only reference the same sheet, using standard notation "(='sheetname'!cell)." To reference another sheet in the formula, use the INDIRECT function.
Example 1
To highlight when there's more than one occurrence of the same value in your data:
- On your computer, open a spreadsheet in Google Sheets.
- Select the range you want to format. For example, cells A1 to A100.
- Click Format
- Under the "Format cells if" drop-down menu, click Custom formula is. If there's already a rule, click it or Add new rule
- Write the rule for the first row. In this case the rule would be, "=COUNTIF($A$1:$A$100,A1)>1."
- Choose other formatting properties.
- Click Done.
Example 2
To format an entire row based on the value of one of the cells in that row:
- On your computer, open a spreadsheet in Google Sheets.
- Select the range you want to format, for example, columns A:E.
- Click Format
- Under the "Format cells if" drop-down menu, click Custom formula is. If there's already a rule, click it or Add new rule
- Write the rule for the first row. For example, if you want to make the whole row green if the value in column B is "Yes", write a formula like "=$B1="Yes"."
- Choose other formatting properties.
- Click Done.
Absolute vs. relative references
Often, you will need to add dollar signs ($) in front of letters and numbers in formulas so that the formatting is applied using absolute references as opposed to relative references (A1 to B1, A2 to B2).
You can use wildcard characters to match multiple expressions. Wildcard characters can be used with the "Text contains" or "Text does not contain" fields while formatting.
- To match any single character, use a question mark (?). For example, a text rule containing "a?c" would format cells with "abc," but not "ac" or "abbc."
- To match zero (0) or more characters, use an asterisk (*) . For example, a text rule containing "a*c" would format cells with "abc," "ac," and "abbc" but not "ab" or "ca."
- To match a question mark or asterisk in text, you can escape the wildcard characters by adding a tilde (~) in front of them. For example, a text rule containing "a~?c" would format cells with "a?c" but not "abc" or "a~?c."
Notes:
- To remove a rule, point to the rule and click Remove
.
- Rules are evaluated in the order listed. The first rule found to be true will define the format of the cell or range. To reorder rules, click and drag them.
- If you copy and paste from a cell or range that has formatting rules, these rules will be applied when you paste the copied data.
Sort & filter your data in Google Sheets
You can sort data in alphabetical and numerical order, or use filters to hide data you don't want to see.
Note: Filter views are only available on a computer. See the FILTER article for info about the function.
Sort data in alphabetical or numerical order
-
On your computer, open a spreadsheet in Google Sheets.
-
Highlight the group of cells you'd like to sort.
-
Click Data
Sort range.
-
If your columns have titles, click Data has header row.
-
Select the column you'd like to be sorted first and choose a sorting order.
- To add another sorting rule, click Add another sort column.
-
Click Sort.
Sort an entire sheet
-
On your computer, open a spreadsheet in Google Sheets.
-
At the top, right-click the letter of the column you want to sort by.
-
Click Sort sheet by A to Z or Sort sheet Z to A.
Tip: If your sheet includes a header row, freeze the first row.
Sort by color
- On your computer, open a spreadsheet in Google Sheets.
- Select a range of cells.
- Click Data
Create a filter.
- To see filter options, go to the top of the range and click Filter
.
- Sort by color: Choose which text or fill color to filter or sort by. Cells with the color you choose to sort by will move to the top of the range. You can sort by conditional formatting colors, but not alternating colors.
- To turn the filter off, click Data
Turn off filter.
Filter your data
To see and analyze data in a spreadsheet, use filters. Filters let you hide data that you don’t want to see. You’ll still be able to see all your data when you turn the filter off.
Filters vs. filter views
Both filters and filter views help you analyze a set of data in a spreadsheet.
Filters can be useful if:
- You want everyone viewing your spreadsheet to see a specific filter when they open it.
- You want your data to stay sorted after using the filter.
Filter views can be useful if:
- You want to save multiple views.
- You want to name your view.
- You want others to be able to view the data differently. Since filter views need to be turned on by each person viewing a spreadsheet, each person can view a different filter view at the same time.
- You want to share different filters with people. You can send different filter view links to different people so everyone will see the most relevant information for them.
- You want to make a copy or create another view with similar rules.
- You don't have edit access to a spreadsheet and still want to filter or sort. In this case, a temporary filter view will be created.
Note: You can import and export filters, but not filter views.
Use filters in a spreadsheet
To temporarily hide data in a spreadsheet, add a filter.
Note: When you add a filter, anyone with access to your spreadsheet will see the filter too. Anyone with permission to edit your spreadsheet will be able to change the filter.
Filter your data
To filter your data:
-
On your computer, open a spreadsheet in Google Sheets.
- Select a range of cells.
- Click Data
Create a filter.
- To see filter options, go to the top of the range and click Filter
.
- Filter by condition: Choose conditions or write your own.
- Filter by values: To hide data points, uncheck the box next to the data point and click OK.
- Search: Search for data points by typing in the search box.
- Filter by color: Choose which text or fill color to filter by. You can filter by conditional formatting colors, but not alternating colors.
-
To turn the filter off, click Data
Turn off filter.
Tip: You can sort data with a filter turned on. Only the data in the filtered range will be sorted. Learn how to sort data.
Create, name, and save a filter view
Use a filter view when:
- You want to save your filter and use it later.
- You don't want to disrupt others' view of the data.
- You want to share a link to a specific filter with others.
- You can’t edit a spreadsheet, but you want to filter or sort data.
- On your computer, open a spreadsheet in Google Sheets.
- Click Data
Filter views
Create new filter view.
- Sort and filter the data.
- To close your filter view, go to the top right and click Close
.
- Your filter view is saved automatically.
To delete or duplicate a filter view, in top right, click Options
Delete or Duplicate.
Rename a filter view
- On your computer, open a spreadsheet in Google Sheets.
- Click Data
Filter views.
- Select a filter view.
- Click the filter view name in the top left of the black bar and type the new name.
- Press Enter.
See an existing filter view
- On your computer, open a spreadsheet in Google Sheets.
- Click Data
Filter views.
- Select a filter view.
- Your filter will be applied to the spreadsheet.
- To close your filter view, go to the top right and click Close
.
Save a filter as a filter view
-
On your computer, open a spreadsheet in Google Sheets.
-
Apply a filter.
-
Click Data
Filter views
Save as filter view.
Use filter view with "view only" access
If you have permission to view a spreadsheet but not edit it, you can still use filter views:
- To apply existing filter views, click Data
Filter views.
- You can create a temporary filter view that only you can use. Because you don’t have "edit" access to the spreadsheet, the filter view won't be saved.
- Only users with permission to edit a spreadsheet can create filter views that anyone viewing the spreadsheet can use.
Google Slides
How to Use Google Slides
Google Slides is an online presentation app that lets you create and format presentations and work with other people.
Step 1: Create a presentation
To create a new presentation:
- Open the Slides home screen at slides.google.com.
- In the top left, under "Start a new presentation," click New
You can also create new presentations from the URL https://slides.google.com/create.
Step 2: Edit and format a presentation
You can add, edit, or format text, images, or videos in a presentation.
Step 3: Share & work with others
Change the Theme, Background, or Layout in Google Slides
You can customize how your presentation looks in Google Slides by changing the theme, background, or layout.
- Theme: A preset group of colors, fonts, background, and layouts.
- Background: The picture or color behind your slide's content.
- Layout: The way your text and images are arranged on a slide.
Computer AndroidiPhone & iPad
Change theme
A theme is a preset group of colors, fonts, backgrounds, and layouts.
- On your computer, open a presentation in Google Slides.
- At the top, click SlideChange theme.
- On the right, click the theme you want.
Note: Learn how to apply a theme to only one slide.
Change the background color or image
Change background color
A background is the picture or color behind your slide's content. You can change the background color of one slide or the whole presentation.
- On your computer, open a presentation in Google Slides.
- Choose a slide.
- At the top, click SlideChange background.
- To the right of "Color," click the box and choose a color.
- To add the color to one slide, click Done.
- To add the color to the whole presentation, click Add to theme.
Change background image
You can add an image saved in Google Drive or on your computer, then apply it to one slide or the whole presentation.
Note: Images must be a .gif, .jpg, or .png, and less than 50 MB.
- On your computer, open a presentation in Google Slides.
- Choose a slide.
- At the top, click Slide Change background.
- To the right of "Image," click Choose.
- Choose an image, then click Select.
- To add the image to one slide, click Done.
- To add the image to the whole presentation, click Add to theme.
Import new theme
Note: Your imported theme must be from an existing Google Slides or PowerPoint presentation. You can also use your own image as the background for the entire presentation.
- On your computer, open a presentation in Google Slides.
- At the top, click Slide Change theme.
- In the bottom right, click Import theme.
- Double-click the presentation you want to use.
- Click the theme you want.
- Click Import theme.
Edit your theme colors
You can change the individual colors that make up your presentation's theme.
- On your computer, open a presentation in Google Slides.
- At the top, click View Master.
- At the top, click Colors .
- To the right, under "Theme colors," choose the color you want to edit from the drop-down.
- To use a pre-set color: Under "Default," click the color you want to use.
- To customize a color: In the multi-colored square, click the color you want to use or enter a hex value.
Change layout
A layout is the way your text and images are arranged on a slide.
- On your computer, open a presentation in Google Slides.
- Select a slide.
- At the top, click Layout.
- Choose the layout you want to use.
Google Forms
Information Regarding How to Build Google forms, Build Quizzes with Google Forms
How to use Google Forms
Step 1: Set up a new form or quiz
- Go to forms.google.com.
- Click Blank
- A new form will open.
Step 2: Edit and format a form or quiz
You can add, edit, or format text, images, or videos in a form.
Step 3: Send your form for people to fill out
When you are ready, you can send your form to others and collect their responses.
Edit your form
After you've created a form, you can add and edit up to 300 pieces of content, like questions, descriptions, images, and videos. To organize your form by topic, you can add up to 75 sections.
Add questions, headers & sections
Delete or edit items
To edit a question, header, or description, click the text you want to change.
Randomly order questions and answers
You can have questions and answers appear in a different order for everyone who fills out your form.
Note: Questions and answers will only be shuffled once per email address. Make sure each address is entered separately and not sent to a Google Group.
Change your default settings
To make every new form use the same settings:
- In Google Forms, open a form.
- At the top, click More
- Any setting you turn on will be the default for any new form.
Create & grade quizzes with Google Forms
Make a new quiz & answer key
- In Google Forms, click Plus
.
- At the top right, click Settings
.
- Click Quizzes
Make this a quiz.
- Optional: To collect email addresses, click General
- Click Save.
Grade quizzes
You can see automatic summaries for all quiz responses, including:
- Frequently missed questions
- Graphs marked with correct answers
- Average, median, and range of scores
Grade individual responses
If you collect email addresses, you can assign points and leave feedback on individual responses. After you grade each response, save your changes.
- In Google Forms, open a quiz.
- At the top, click Responses.
- Click Individual.
- To move between individuals, click Previous
or Next
.
- Find the question you want to grade.
- In the top right, enter how many points the response earned.
- Under the answer, click Add feedback.
- Enter your feedback and click Save.
- To save your changes, at the bottom, click Save.
Share results
If you collect email addresses in your form, you can send results immediately or wait until you’re ready to share them.
By default:
- Grades will release immediately
- Email addresses won’t be collected.
Change how you release grades
- At the top right, click Settings
- Click Quizzes.
- Choose Later, after manual review.
- Save.
Email results after review
- In Google Forms, open a quiz.
- At the top, click Responses
- At the top right of a response with a recorded email address, click Release score.
- Check the boxes next to the people you want to email.
- Click Send emails and release.
How to Show questions based on answers in Google Forms
Show questions based on answers
You can set up a survey so that people only see certain sections based on their answers.
- Open a form in Google Forms.
- At the bottom right, click More
- You can also choose Submit form if you want the survey to end based on an answer.
- Choose specific sections to send people to.
Skip sections in your form
- Open a form in Google Forms.
- To add a section break, click Add section
.
- At the bottom of each section, you can choose which section people go to next.
Filestream
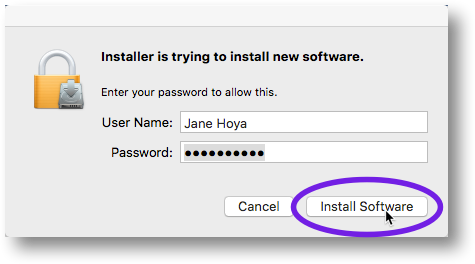
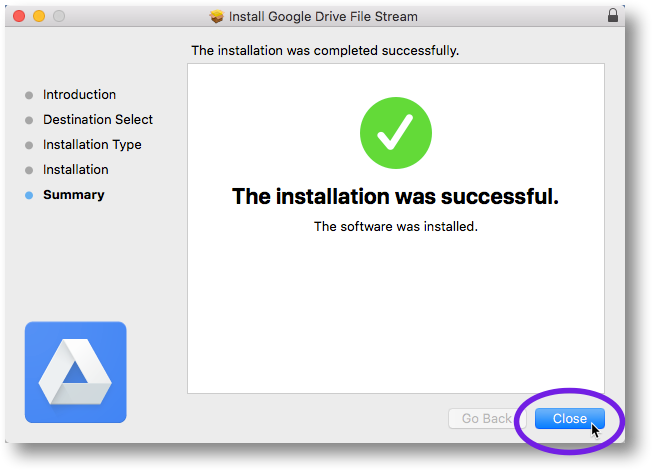
Installing Google Drive File Stream for Mac
- From a Finder window, delete the old Google Drive folder from your computer. (The folder should be listed under “Devices”.)
- If you haven’t already done so, log in to your Georgetown Google Apps account.
- From your Web browser, go to the Google Drive File Stream home page.

- On the “Google Drive Help” page, click Download for Mac.
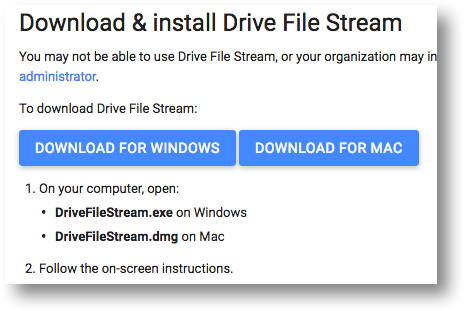
- If prompted, save the installer file to your Desktop. (If you’re not prompted, the file may have been saved in your Downloads folder.)
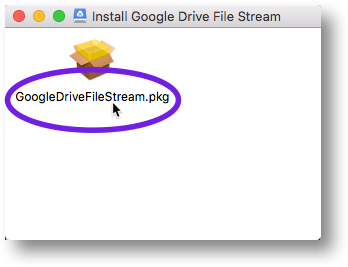
- Double-click the installer file.
- Double-click the .pkg file
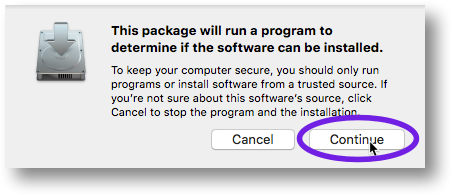
- In the pop-up window, click Continue.
- Click Continue in the next window.
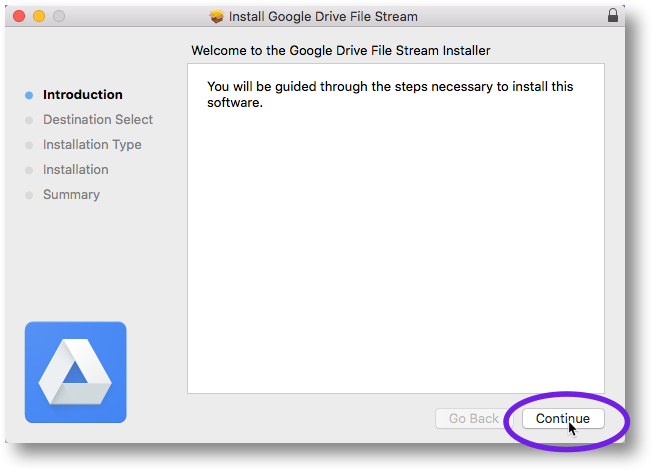
- Click Install in the next window.
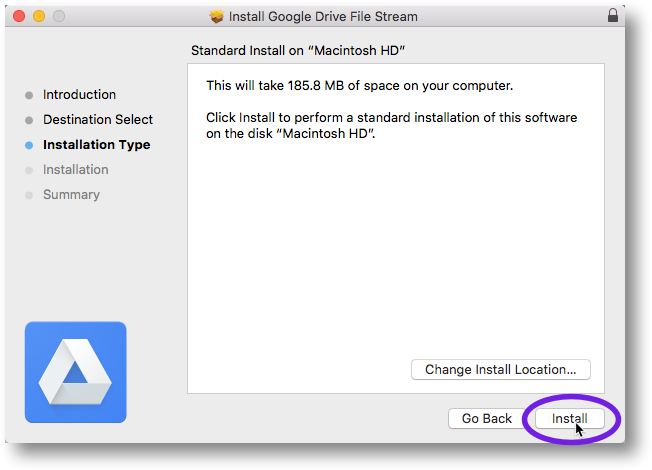
- In the next window, enter your computer password and then click Install Software to start the installation process.
- After a few moments, you should see the following install confirmation message. Click Close.
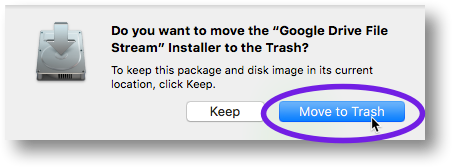
- If you see the pop-up window shown below, click Move to Trash.
Transfer Ownership in Google Drive
Transfer file ownership
You’re the owner by default for files that you create in Docs, Sheets, and Slides, or upload into Drive. But, you can transfer ownership of your Google files (Docs, Sheets, and Slides) and folders to anyone you'd like, as long as that person has an email address.
How to change owners
You can change who owns a file or folder in Drive.
- Go to Drive or a Docs, Sheets, or Slides home screen.
- Open the sharing box:
- In Drive: Select the file or folder and click the share icon at the top
.
- In a Docs, Sheets, or Slides home screen: Open the file and click Share in the top-right corner of the file
- In Drive: Select the file or folder and click the share icon at the top
- If the new owner already has edit access, skip to Step 4. Otherwise, follow these steps:
- Type the email address of the new owner in the "Invite people" field
- Click Share & save.
- Click Advanced in the bottom-right corner of the sharing box.
- Click the drop-down menu next to the name of the person you want to own the file or folder.
- Select Is owner.
- Click Done.
You'll have access to the file as an editor after you transfer ownership.
Google Apps Customers: You can't make someone outside of your domain the owner of your Google Doc. Only Google Apps customers in Government and Education domains can transfer ownership of a synced or uploaded file (like a PDF or image file).
Consumer Drive users: You can't transfer ownership of a synced or uploaded file (like a PDF or an image file).
Things to consider before you transfer ownership
- The things you’ll no longer be able to do once you transfer file ownership include:
- Remove others from the file
- Share with as many people as you like
- Change visibility options
- Allow your collaborators to change access privileges for others
- Permanently delete something from Google Drive. After it’s deleted, no one can access it, including those it was shared with.
- When you transfer ownership of a folder from yourself to another person, the new owner of the folder becomes an editor of the files in that folder. The original owners of the files remain the owners, and if the original owner deletes a file, it'll be removed from the folder.
- If your current Google Account is being deleted, transfer ownership of your files, folders, and Google files to another active account. Once the original account is deleted, you won’t be able to recover any of your files or folders from it.
How to Share Google Calendar
- Go to calendar.google.com
- In the My calendars list on the left side of the page, click the down-arrow button next to the calendar you want to share, then select Share this calendar.
- Enter the email address of the person you want to share your calendar with.
- From the drop-down menu on the right side, select a level of permission, then click Add Person.
- For a busy search only for Public, set the permissions for Make Available for Iredell-Statesville Schools to See Only Free/Busy (Hide details) from the drop down box
- If you want to send a link to someone, click the Get Sharable Link
- Click Save.
Share a File in Google Drive
Step 1: Find the file you want to share
Share a single file
- On a computer, go to Google Drive, Docs, Sheets, or Slides.
- Click the file you want to share.
- Click Share or Share
.
Step 2: Choose who to share with & how they can use your file
Share with specific people
If you use a Google Account through work or school, you might not be able to share files outside of your organization.
- Under "People," enter the email address you want to share with.
- Note: If you share with an email address that isn’t a Google Account, they’ll only be able to view the file.
- To choose what someone can do with your file, click the Down arrow
.
- If you don’t want to send an email to people, click Advanced and uncheck the Notify people box. If you notify people, each email address you enter will be included in the email.
- Click Send.
Share & collaborate on a file with more than 100 people
Up to 100 people with view, edit, or comment permissions can work on a Google Docs, Sheets, or Slides file at the same time. When more than 100 people are accessing a file, only the owner and some users with editing permissions can edit the file.
Publish the file
- If you need many people to view a file at once, publish it and create a link to share to viewers. You can give edit access to people who need to edit or comment on the file. Learn how to publish a file.
- Publishing a file makes it visible to everyone on the web. Be careful when publishing private or sensitive info. If you have an account through work or school, your administrator can limit who can view a published file. If you're an administrator, learn how to control who can publish documents to the web.
- To remove a file from the web, you must stop publishing it. Learn how to stop publishing a file.
- To stop sharing a file with collaborators, learn how to change sharing permissions.
Check or revert to earlier file versions in Drive
View or revert to earlier versions of Docs, Sheets, and Slides files
Note: You need Owner or Can edit access to see the version history.
- In Drive, open your file.
- Click File
- Click a timestamp to see a previous version of the file. Below the timestamp, you’ll see:
- Names of people who edited the document.
- A color next to each person’s name. The edits they made appear in that color.
- (Optional) To revert to this version, click Restore this version.
Upload a new version of a non-Google file to Drive
On the web
- In Drive, right-click the file that isn’t in a Google format and select Manage versions.
- Click Upload New Version and select the file from your computer.
- When the new version is uploaded, click Close.
From your computer
- If you haven't already, install Drive File Stream.
- On your computer, find the non-Google file.
- Click Drive File Stream
.
- Click Open Google Drive
.
- Do one of the following actions:
- To move the file, drag it into a folder.
- To copy the file, copy and paste it into a folder.
The file synchronizes automatically to Drive on the web. If you update an existing file, the previous file is overwritten, but versions are maintained.
Download or revert to earlier versions of non-Google files in Drive
- In Drive, click the file and at the top right, click More
Manage versions.
- Click More
to download the file.
- (Optional) To revert to an earlier version (such as the one you downloaded above), click Upload New Version, find the version of the file, and click Open.
- Click Close.
How to Upload to Google Drive
Upload files & folders
On your computer, you can upload from drive.google.com or your desktop. You can upload files into private or shared folders.
- On your computer, go to drive.google.com.
- At the top left, click New
- Choose the file or folder you want to upload.
Drag files into Google Drive
- On your computer, go to drive.google.com.
- Open or create a folder.
- To upload files and folders, drag them into the Google Drive folder.
Ways to Transfer Google Drive Files
Use Google Takeout
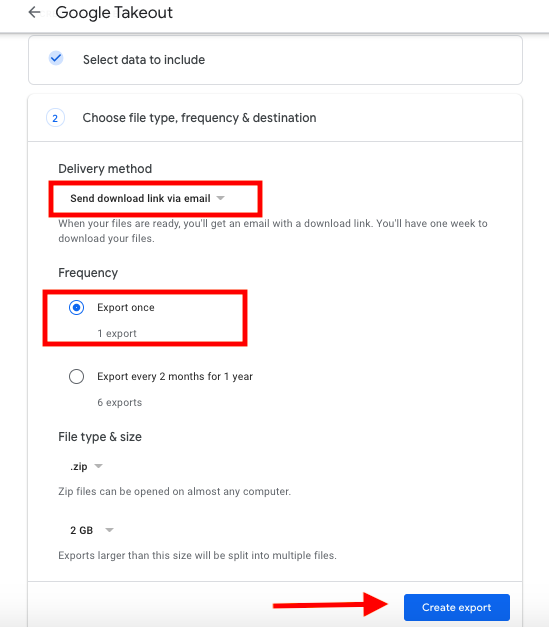
Go to https://takeout.google.com/ and choose which data you want to save from Google Takeout. If you want to ONLY download Google Drive, you can click Deselect All at the top and then check the box beside Google Drive and scroll down and click Next.
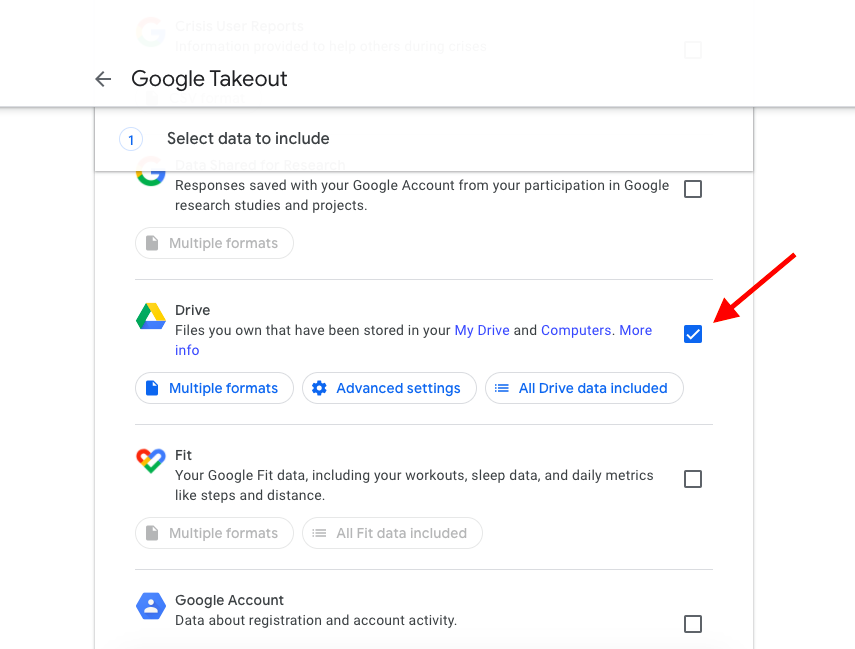
Make sure the Options are Selected to Send download link via email, and export once and then click Create Export.